I seem to have a renewed love of maxi dresses. So this is going to be a thing for a moment. My latest one is McCall's 7242. I researched this pattern and I found only a handful of iterations. I'm not sure why, because this pattern has great bones. It's a maxi shirt dress. What's not to love?
The lines of this dress are so simple, it screamed out for heavily patterned fabric. I'd found this ikat print at Hancock and I bought what was left on the bolt -- a little over 4 yards. It's a poly chiffon.
I cut the 12 in the bodice and the 14 in the skirt. For this style of dress, the skirt is cut very slim. It's really straight. If you're significantly heavier on the bottom, rely on the finished measurements on the pattern pieces. They're accurate. You may have to go up from you usually pattern size,
I added length to the bodice, the skirt and the ruffle. This sleeveless dress took all 4 yards of the fabric. Instead of creating French seams, I serged my seams. This fabric was shredding like crazy so it was best to just get it done.
I also partially lined the skirt. That is the only part that concerned me.
There is also a hook an eye at the elastic waist.
The armhole has a bias binding finish.
And I finished my ruffle with a narrow hem.
I decided to accessorize my dress with a Tassel Rope Belt. Here's how I made mine:
What you need:
- Rope
- beads
- suede or leather fabric scrap
- ruler
- pen/pencil
- hot glue gun
- scissors or rotary cutter
Note: Make sure your beads will fit over your rope and will still have enough room to slide over your tassel.
First, I made my suede tassels. Mine are 1.25" x 4". You have to cut fringe into the suede/leather first. I did this by creating a 1/4" guideline. My fringe are about 1/8" wide. You can measure these off and draw guidelines or you can eyeball them as I did. And make sure you don't cut through your guideline. You'll need a sharp pair of scissors or a rotary cutter like I used.
String your beads on first.
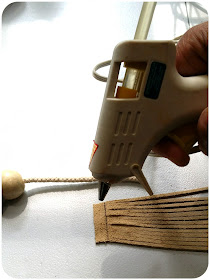
Appy your hot glue to the guideline of the fringe, but not too much!
Tightly roll your fringe guideline around the end of the rope
Slide your bead down over your fringe and work it into place over the guideline.
And repeat for the other side.


Very well done. I love the belt, too. You look amazing!
ReplyDeleteThanks Sew Divine!
DeleteWow Erica..Super cute...question?? What fabric did you line the skirt of the dress with?
ReplyDeleteI used a navy Bemberg rayon. Thanks Lora!
DeleteThis is a cute dress and I love the half lining in it! Glad you've rejoined us in the land of maxi!
ReplyDeleteThank you Carolyn!
DeleteLove the dress and I also like the tassel rope belt very much, it's the perfect accessory for a maxi-dress! Well done!
ReplyDeleteThanks Tany!!!
DeleteCute Maxi! love the belt.
ReplyDeleteThanks Joen!
DeleteVery nice! I'm just waiting for the right fabric to come along to give this one a try. As always, thank you for sharing the construction details.
ReplyDeleteThanks Grace!
DeleteReally fresh and pretty! Thanks for the tip about the slim line of the skirt...I was surprised by this. Love the belt detail as well!!
ReplyDeleteThank you Margo!
DeleteReally Chic!!! The belt is BOSS!!
ReplyDeleteThanks Carol, it was such fun to make!
DeleteThe dress is fantastic, as always! Thank you for sharing the belt tutorial!
ReplyDeleteThanks so much Grumpy without Coffee!
DeleteLove the dress. The lining looks perfect. And the belt is the bestest accessory for it. I want to make one!
ReplyDeleteThanks so much Russell1947!
DeleteI've never paid much attention to this pattern before until I saw your version. I think I skipped over it because the dark long sleeved version on the model just looks way too dowdy or something. Yours looks nice and breezy
ReplyDeleteAlways stare down that technical drawing! Thanks Betty!
Deletestunning, its fantastic on you, brilliant fabric choice
ReplyDeleteThanks Eimear!
DeleteWonderful dress! Great idea for making the belt.
ReplyDeleteThanks Irene!
DeleteLove it!
ReplyDeleteThank you Linda!
DeleteWhat a beautiful dress with very clean professional touches in the finishing of it. And that belt is wonderful - love the color and whimsy of it. You look gorgeous!
ReplyDeleteThank you Tomasa!
DeleteI could have sworn you said you wouldn't be making anymore maxi dresses.... but I'm glad you did because this came out beautifully. I really like the partial lining at the skirt only. Isn't it just annoying when the pretty fabric is a pain to work with?
ReplyDeleteI was on a self-imposed ban! I went for a couple of years without them. But I made this one a little shorter, even though aesthetically I love when the drag the ground. But that's a fall waiting to happen! Thanks Abbey!
DeleteOh man! Thanks for the tutorial! This is a beautiful piece! I love the addition of the skirt underneath, even though it funcitonal I think the blue peaking out from underneath really adds to aesthetic! Another job well done! xoxo -Su
ReplyDeleteThanks Su!
Delete