I'm currently working on Vogue 1323. And when I got to the welt pockets, the instructions were pretty bad. Welt pockets aren't necessarily hard. You just have to be precise in your stitching to insure that your welts aren't skewed. In the Vogue instructions, I feel that they added unnecessary steps that might cause a novice sewer to feel intimidated by this technique, which looks great when sewn well. I'm going to share how I do my welt pockets.
For this particular pattern, I'm eliminating steps 23-36.
Here are the pattern pieces for these steps. I'm only using #20.
I cut out four (3"x7") pieces from #20. These pieces are the (2) welts and (2) facings. I cut these in the same fashion fabric as the pants.
For the pocket bags, I cut two (15"x7") in lining fabric. I used a lightweight cotton. Take a 3"x7" piece of fashion fabric and turn under one edge (or you can serge it) and sew unfinished edge to the top edge of the lining fabric (wrong side to right side)... this piece will become your welt. Edgestitch the turned under end. Take the other piece and finish both edges. Sew 2" from the bottom. This is the pocket facing.
Cut a 3"x7" piece of fusible interfacing and center over the area for the welt box on the wrong side of the pants. Transfer the markings from the pattern piece. Or draw a box 1/2"x5" long.
Draw your welt box on the wrong side of the lining fabric on the backside of the welt area. Pin right-side to right-side on the pants, matching the lines. And stitch precisely!
Slash through all of the fabric down the center, stopping 1/4" from each end. And clipping diagnally into each corner.
Turn the pocket to the inside...
like this. And serge (or zig-zag) the top edge.
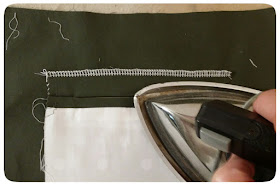
Fold down the top and press the welt opening seam.
And open it back out and press the entire thing.
To create the welt, fold up the bottom part even with the top of the welt opening.
And press.
Turn over and press the right side. Now you see your welt!
To hold it in place, edge stitch around, while making sure sure to keep the lining fabric out of the way.
Here's the what the wrong side looks like.
To create the pocket, fold the lining fabric up to the top edge of the pants.
Fold back and carefully stitch the top of the welt to the pocket fabric right above the welt opening seam. This is to secure the pocket fabric to the welt.
Stitch and finish the sides of the pockets and baste to the top of the pants.
Done! I hope this makes welt pockets a lot easier for you.


Thank you for taking the time to share. I was nervous about making the welt because it will be my first time sewing this pattern.
ReplyDeleteI hope it works for your. I've tried before to do welts as the instructions suggested and for the longest time, I hated welts! This way changed my sewing life! Thanks for reading Thelma!
DeleteTHAT is ridiculously awesome! I always get nervous when sewing welts because they are so finicky, but this will really simplify the process. Thanks so much for sharing.
ReplyDeleteThanks Amanda!
DeleteThanks for this excellent tutorial Erica!
ReplyDeleteThanks for reading Sheri!
DeleteThank you, I have avoided welt pockets in the past, but this is a great tutorial, I will give it a go.
ReplyDeleteThanks Kate!
DeleteThanks for this tutorial! Clear with helpful photos.
ReplyDeleteThanks Angela for reading!
DeleteThank you for the tutorial! So much simpler!
ReplyDeleteThanks for reading Shawn!
DeleteThank you, thank you, thank you!!! I pinned this and Im good to go!
ReplyDeleteThanks so much Ines!
DeleteThank you for sharing this pictorial with functional pockets to hold my phone. I'm over here doing the moonwalk with a blend of a happy dance.
ReplyDeleteGlad you like it!
DeleteSuch a great tutorial erica. Thank you
ReplyDeleteThanks for reading sewmanju!
DeleteThanks for that!
ReplyDeleteThanks for reading Fiona!
DeleteMuch easier than pattern instructions!!! Thanks so much Erica
ReplyDeleteSo much easier! Thanks Lisa!
DeleteYou are awesome
ReplyDeletei am going to try your method.
Thanks Geannene!
DeleteThank you, I vve saved the instructs in my sewing ideas book, I love I found a better way instructions.
ReplyDeleteI love those too! Thanks Sheseams!
DeleteThank you! This is a great tutorial. I always have to scratch my head when doing these kind of pockets, so now, I can just come look at your tutorial instead!
ReplyDeleteThose and bound buttonholes use to cause me anxiety. I knew there had to be a better way! Thanks Ann!
DeleteThanks Erica...I have never sewn a welt pocket so the concept is a little overwhelming. I had to read and conceptualize it a few times...but I think I got it. I can't wait to try your method:)
ReplyDeleteThanks for giving it shot!
DeleteI've made scary welt pockets before with pretty good results - still scary though. You made it look a whole lot easier. Will try your method.
ReplyDeleteNo more scary welts! Thanks Faye!
DeleteThanks Erica,
ReplyDeleteThe tutorial is very plain, to the point, & easy to follow. Thanks for sharing. Welt Pockets are one of my sewing nemesis 😊, I might just make my first successful pea coat this year!
Great! I'm glad you like it!
DeleteThankyou for sharing your sewing knowledge. I avoid making pants because I fear I won't understand the instructions but you make it look so simple.
ReplyDeleteYou are most definitely welcome! I hope you approach pants making with a different attitude now! They're not difficult!
DeleteExcellent tutorial, it makes the process seem very straightforward, but with great results, thanks for taking the time to share it.
ReplyDeleteGlad you like it Allison!
DeleteGlad you like it Allison!
Delete